1. 구글 폰트 사이트 (Google Fonts)
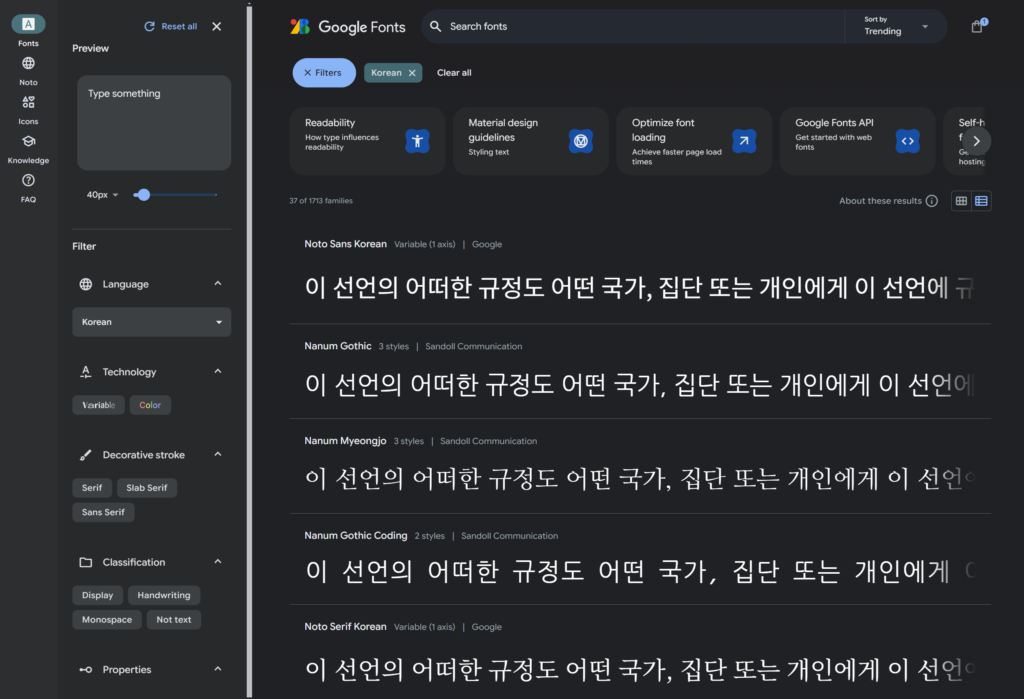
구글 폰트 사이트는 무료로 다양한 폰트를 사용할 수 있습니다.
좌측의 Filter 를 사용하여 언어와 글자 모양 등을 설정하여 검색하면 더 찾기 쉽습니다.
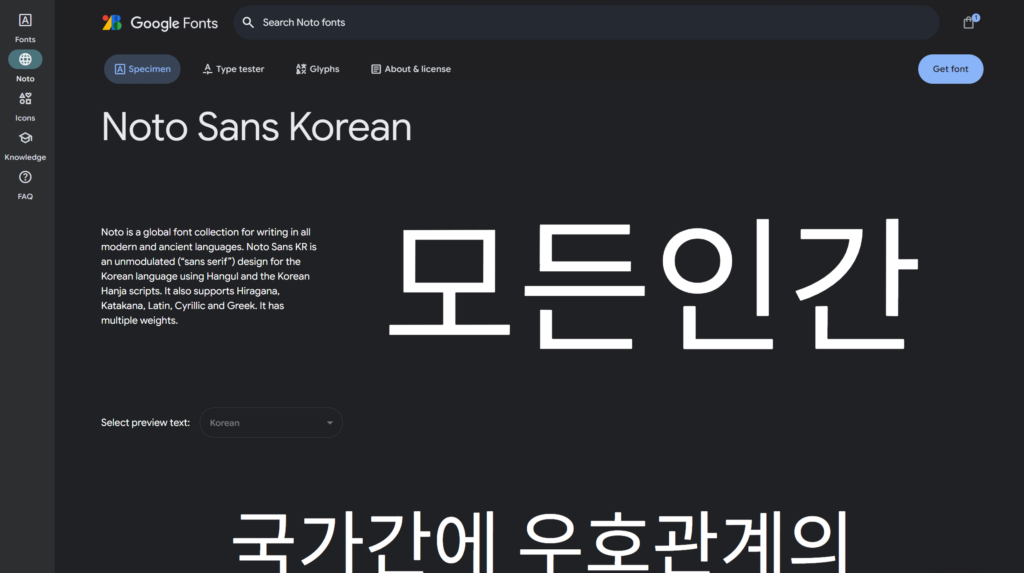
원하는 폰트 클릭 후 우측 상단에 Get font 버튼을 눌러줍니다
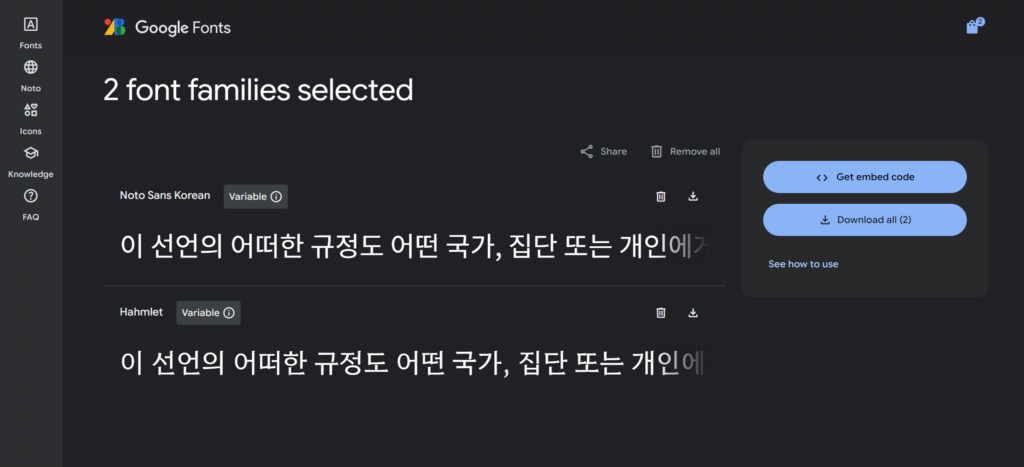
그러면 우측에 Get embed code와 Download all 버튼이 생깁니다
이때, 좌측을 보시면 Noto Sans Korean 과 Hahmlet 두가지의 폰트가 선택되어 있는데요
원하지 않는 폰트는 Remove 버튼을 눌러서 삭제해줍니다.
2. Get embed code (웹 폰트 적용 방법)
폰트를 다운 받지 않고 html 과 css 파일에 코드를 추가하여 바로 사용할 수 있는 방법입니다.
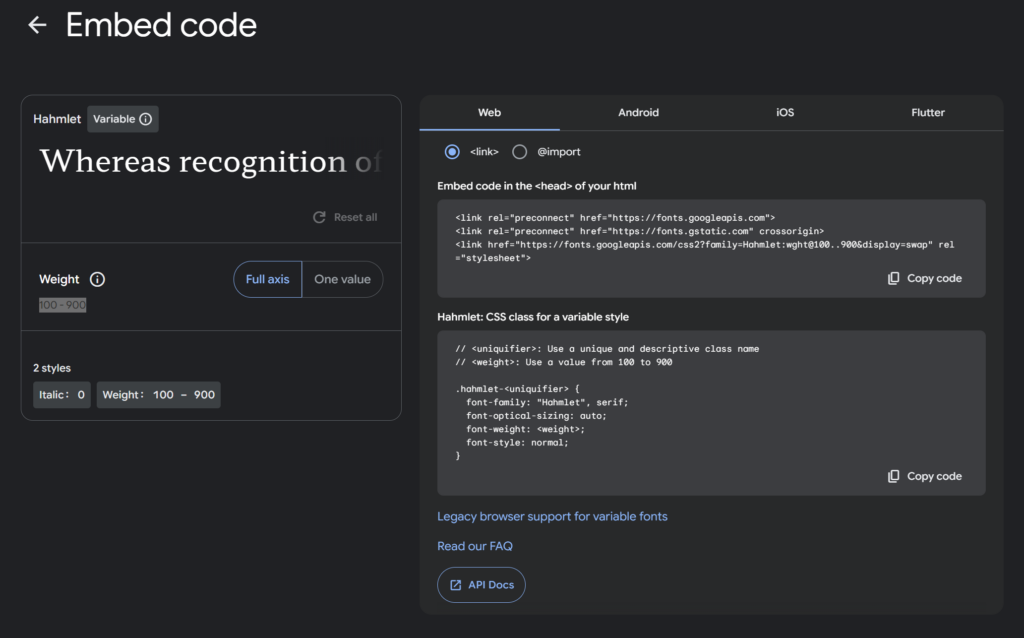
제가 선택한 Hahmlet 폰트는 Weight 가 100 부터 900까지 지원됩니다.
적용 방법은 <link> 또는 @import 가 있습니다.
2-1. html 헤더에 <link> 추가 + css 파일에 class 생성
<!DOCTYPE html>
<html lang="ko">

<head>
    <meta charset="UTF-8">
    <meta name="viewport" content="width=device-width, initial-scale=1.0">
    <title>웹폰트</title>
    <link rel="stylesheet" href="/css/font.css">

    <!-- 웹폰트 link 태그 시작 -->
    <link rel="preconnect" href="https://fonts.googleapis.com">
    <link rel="preconnect" href="https://fonts.gstatic.com" crossorigin>
    <link href="https://fonts.googleapis.com/css2             family=Hahmlet:wght@100..900&family=Noto+Sans+KR:wght@100..900&display=swap"
        rel="stylesheet">
    <!-- 웹폰트 link 태그 끝 -->

</head>

<body>
    <h1>결과물</h1>
    <ul>
        <li>적용안함</li>
        <li class="hahmlet-100">클래스명: font-weight 100</li>
        <li class="hahmlet-200">클래스명: font-weight 200</li>
        <li class="hahmlet-300">클래스명: font-weight 300</li>
        <li class="hahmlet-400">클래스명: font-weight 400</li>
        <li class="hahmlet-500">클래스명: font-weight 500</li>
        <li class="hahmlet-600">클래스명: font-weight 600</li>
        <li class="hahmlet-700">클래스명: font-weight 700</li>
        <li class="hahmlet-800">클래스명: font-weight 800</li>
        <li class="hahmlet-900">클래스명: font-weight 900</li>
    </ul>
</body>

</html>
“Embed code in the <head> of your html” 부분에 적힌 코드를 복사하여 html 헤더태그 사이에 넣어줍니다.
/* <uniquifier>: Use a unique and descriptive class name */
/* <weight>: Use a value from 100 to 900 */

.hahmlet-100 {
  font-family: "Hahmlet", serif;
  font-optical-sizing: auto;
  font-weight: 100;
  font-style: normal;
}
.hahmlet-200 {
    font-family: "Hahmlet", serif;
    font-optical-sizing: auto;
    font-weight: 200;
    font-style: normal;
  }
  .hahmlet-300 {
    font-family: "Hahmlet", serif;
    font-optical-sizing: auto;
    font-weight: 300;
    font-style: normal;
  }
  .hahmlet-400 {
    font-family: "Hahmlet", serif;
    font-optical-sizing: auto;
    font-weight: 400;
    font-style: normal;
  }
  .hahmlet-500 {
    font-family: "Hahmlet", serif;
    font-optical-sizing: auto;
    font-weight: 500;
    font-style: normal;
  }
  .hahmlet-600 {
    font-family: "Hahmlet", serif;
    font-optical-sizing: auto;
    font-weight: 600;
    font-style: normal;
  }
  .hahmlet-700 {
    font-family: "Hahmlet", serif;
    font-optical-sizing: auto;
    font-weight: 700;
    font-style: normal;
  }
  .hahmlet-800 {
    font-family: "Hahmlet", serif;
    font-optical-sizing: auto;
    font-weight: 800;
    font-style: normal;
  }
  .hahmlet-900 {
    font-family: "Hahmlet", serif;
    font-optical-sizing: auto;
    font-weight: 900;
    font-style: normal;
  }
“Hahmlet: CSS class for a variable style” 부분에 적힌 코드를 복사하여 css 파일에 넣어줍니다.
이때 저는 <uniquifier> 부분에 weight 를 적어주어 클래스 사용 시 폰트 두께를 구문 할 수 있도록 하였습니다.

2-2. html 헤더에 <style> @import 추가 + css 파일에 class 생성
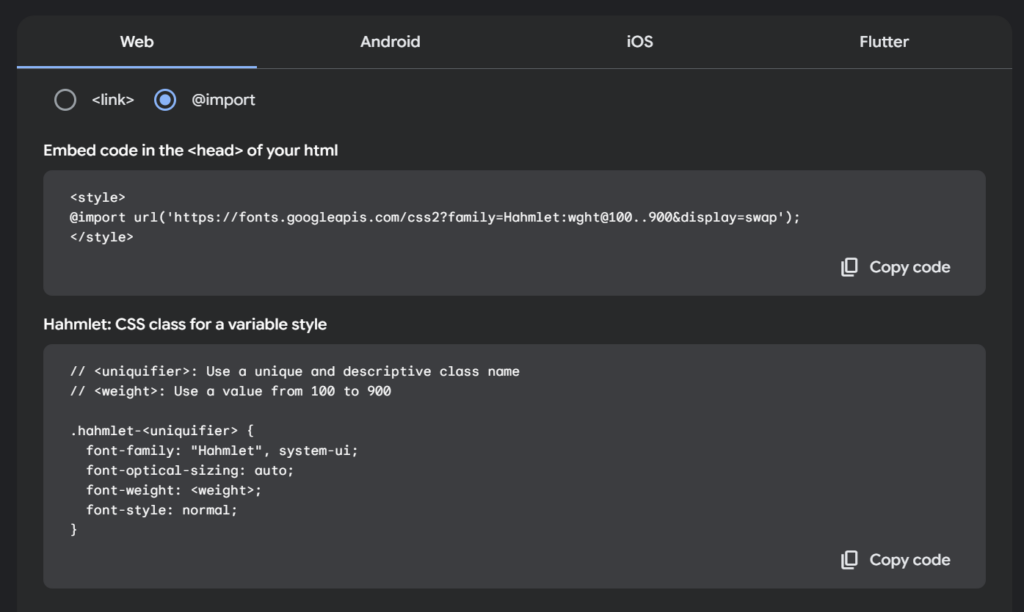
@import 를 체크하면 html 헤드 태그에 넣을 스타일 태그가 나옵니다
<!DOCTYPE html>
<html lang="ko">

<head>
    <meta charset="UTF-8">
    <meta name="viewport" content="width=device-width, initial-scale=1.0">
    <title>웹폰트</title>
    <link rel="stylesheet" href="/css/font.css">

    <!-- 웹폰트 style 태그 시작 -->
    <style>
        @import url('https://fonts.googleapis.com/css2?family=Hahmlet:wght@100..900&display=swap');
    </style>
    <!-- 웹폰트 style 태그 끝 -->

</head>

<body>
    <h1>결과물</h1>
    <ul>
        <li>적용안함</li>
        <li class="hahmlet-100">클래스명: font-weight 100</li>
        <li class="hahmlet-200">클래스명: font-weight 200</li>
        <li class="hahmlet-300">클래스명: font-weight 300</li>
        <li class="hahmlet-400">클래스명: font-weight 400</li>
        <li class="hahmlet-500">클래스명: font-weight 500</li>
        <li class="hahmlet-600">클래스명: font-weight 600</li>
        <li class="hahmlet-700">클래스명: font-weight 700</li>
        <li class="hahmlet-800">클래스명: font-weight 800</li>
        <li class="hahmlet-900">클래스명: font-weight 900</li>
    </ul>
</body>

</html>
아까와 마찬가지로 “Embed code in the <head> of your html” 부분에 적힌 코드를 복사하여 html 헤더태그 사이에 넣어줍니다.
/* <uniquifier>: Use a unique and descriptive class name */
/* <weight>: Use a value from 100 to 900 */

.hahmlet-100 {
    font-family: "Hahmlet", serif;
    font-optical-sizing: auto;
    font-weight: 100;
    font-style: normal;
  }
  .hahmlet-200 {
      font-family: "Hahmlet", serif;
      font-optical-sizing: auto;
      font-weight: 200;
      font-style: normal;
    }
    .hahmlet-300 {
      font-family: "Hahmlet", serif;
      font-optical-sizing: auto;
      font-weight: 300;
      font-style: normal;
    }
    .hahmlet-400 {
      font-family: "Hahmlet", serif;
      font-optical-sizing: auto;
      font-weight: 400;
      font-style: normal;
    }
    .hahmlet-500 {
      font-family: "Hahmlet", serif;
      font-optical-sizing: auto;
      font-weight: 500;
      font-style: normal;
    }
    .hahmlet-600 {
      font-family: "Hahmlet", serif;
      font-optical-sizing: auto;
      font-weight: 600;
      font-style: normal;
    }
    .hahmlet-700 {
      font-family: "Hahmlet", serif;
      font-optical-sizing: auto;
      font-weight: 700;
      font-style: normal;
    }
    .hahmlet-800 {
      font-family: "Hahmlet", serif;
      font-optical-sizing: auto;
      font-weight: 800;
      font-style: normal;
    }
    .hahmlet-900 {
      font-family: "Hahmlet", serif;
      font-optical-sizing: auto;
      font-weight: 900;
      font-style: normal;
    }
css 파일에도 아까와 동일하게
“Hahmlet: CSS class for a variable style” 부분에 적힌 코드를 복사하여 css 파일에 넣어줍니다.

3. Download (로컬 폰트 적용 방법)
다운로드 버튼을 누르면 선택한 폰트를 다운 받을 수 있습니다.
웹폰트 파일 확장자로는 .woff(웹오픈폰트) .ttf(트루타입폰트) .otf(오픈타입폰트) 등이 있습니다.
저의 경우 압축을 해제하니 두께별로 ttf 파일이 있었습니다.

3-1. 폰트 파일의 종류
폰트 파일은 글꼴을 디지털 장치에서 표시하기 위해 사용되는 파일 형식입니다. 각각의 파일 형식은 특정한 장점과 용도로 사용되며, 아래에 주요한 폰트 파일 형식에 대한 설명을 제공합니다:
- TTF (TrueType Font):
- 설명: TTF는 1980년대 후반에 Apple과 Microsoft가 공동 개발한 폰트 파일 형식입니다. 가장 널리 사용되는 포맷 중 하나로, 단순하면서도 높은 호환성을 자랑합니다. TTF 파일은 글꼴의 스크린과 인쇄 품질을 유지하기 위해 비트맵 데이터를 사용합니다.
- 장점: 대부분의 운영 체제와 호환되며, 간단한 구조로 인해 빠른 렌더링 속도를 제공합니다.
- OTF (OpenType Font):
- 설명: OTF는 TrueType의 발전된 버전으로, Adobe와 Microsoft가 공동 개발한 포맷입니다. OTF는 TTF와는 달리 비트맵 대신 곡선 데이터를 기반으로 하며, 더 많은 타이포그래피 기능을 지원합니다. 예를 들어, 다양한 언어의 글자 형태, 서체 스타일, 리가처(ligatures) 등이 가능합니다.
- 장점: 다양한 글꼴 기능과 높은 확장성을 제공하며, 인쇄와 디지털 디스플레이 모두에 적합합니다.
- WOFF (Web Open Font Format):
- 설명: WOFF는 웹에서 폰트를 효율적으로 사용하기 위해 개발된 파일 형식입니다. TTF나 OTF와 같은 폰트를 압축하여 웹 페이지에 포함할 수 있게 해줍니다. 이는 웹 페이지 로딩 시간을 단축하고, 폰트를 보호하는 데 도움이 됩니다.
- 장점: 웹에서 사용하기에 적합하며, 파일 크기를 줄여 로딩 속도를 향상시킵니다.
- WOFF2 (Web Open Font Format 2):
- 설명: WOFF2는 WOFF의 후속 버전으로, 더 높은 압축률을 제공하여 파일 크기를 더욱 줄일 수 있습니다. Google이 주도하여 개발한 이 포맷은 더욱 최적화된 웹 폰트 렌더링을 가능하게 합니다.
- 장점: WOFF보다 더 작은 파일 크기를 제공하며, 웹에서 폰트 파일을 효율적으로 전송할 수 있습니다.
이와 같은 폰트 파일 형식은 각기 다른 용도와 플랫폼에서 최적의 성능을 발휘하며, 디자이너와 개발자는 이들 중 적절한 파일 형식을 선택하여 사용합니다.
3-2. 로컬 폰트 적용
다운 받은 폰트를 fonts 폴더에 넣고 font.css 파일에 내용을 추가 해줍니다.
@font-face {
    font-family: "Hahmlet";
    font-weight: 100;
    font-style: normal;
    src: url('/fonts/Hahmlet/Hahmlet-Thin.ttf') format('truetype');
}
@font-face {
  font-family: "Hahmlet";
  font-weight: 200;
  font-style: normal;
  src: url('/fonts/Hahmlet/Hahmlet-ExtraLight.ttf') format('truetype');
}
@font-face {
  font-family: "Hahmlet";
  font-weight: 300;
  font-style: normal;
  src: url('/fonts/Hahmlet/Hahmlet-Light.ttf') format('truetype');
}
@font-face {
  font-family: "Hahmlet";
  font-weight: 400;
  font-style: normal;
  src: url('/fonts/Hahmlet/Hahmlet-Regular.ttf') format('truetype');
}
@font-face {
  font-family: "Hahmlet";
  font-weight: 500;
  font-style: normal;
  src: url('/fonts/Hahmlet/Hahmlet-Medium.ttf') format('truetype');
}
@font-face {
  font-family: "Hahmlet";
  font-weight: 600;
  font-style: normal;
  src: url('/fonts/Hahmlet/Hahmlet-SemiBold.ttf') format('truetype');
}
@font-face {
  font-family: "Hahmlet";
  font-weight: 700;
  font-style: normal;
  src: url('/fonts/Hahmlet/Hahmlet-Bold.ttf') format('truetype');
}
@font-face {
  font-family: "Hahmlet";
  font-weight: 800;
  font-style: normal;
  src: url('/fonts/Hahmlet/Hahmlet-ExtraBold.ttf') format('truetype');
}
@font-face {
  font-family: "Hahmlet";
  font-weight: 900;
  font-style: normal;
  src: url('/fonts/Hahmlet/Hahmlet-Black.ttf') format('truetype');
}


/* 사용할 부분에 폰트 적용 */
body{
  font-family: "Hahmlet";
}
- font-family :
"Hahmlet"는 사용자가 지정한 폰트의 이름입니다. CSS에서 이 이름으로 폰트를 참조할 수 있습니다. - src : 폰트 파일의 경로를 지정합니다. 위의 예시에서는 .ttf 만 있지만
.woff2,.woff,.ttf파일 등을 여러 개 지정할 수 있습니다.브라우저는 가능한 첫 번째 파일을 사용하며, 지원하지 않는 경우 다음 파일을 시도합니다. 따라서 여러 개의 폰트 파일을 불러올 경우 가장 크기가 작은 파일부터 순서대로 쓰는 것이 좋습니다. (예시, woff2 – woff – ttf)local(): 사용자의 로컬환경에 설치된 폰트는 local() 이라는 구문을 사용하여 지정가능url(): 파일의 위치를 나타내는 URL 값format(): 파일 형식을 지정woff,woff2,truetype,opentype,embedded-opentype,svg중에 선택
/* 여러개의 src 예시 */
@font-face {
    font-family: "Hahmlet";
    src: local('Hahmlet-Medium'),
        url('/fonts/Hahmlet-Medium.woff2') format('woff2'),
        url('/fonts/Hahmlet-Medium.woff') format('woff'),
        url('/fonts/Hahmlet-Medium.ttf') format('truetype');
    font-weight: 500;
    font-style: normal;
}- font-weight 및 font-style: 폰트의 굵기와 스타일을 지정합니다. 필요에 따라
bold,italic등의 값을 사용할 수 있습니다.

4. CDN 사용
Content Delivery Network 의 약자로 정적인 파일들을 전세계에 분산된 여러 서버에 저장해 두고, 사용자가 해당 파일에 접근할 때 자동으로 가장 가까운 서버에서 파일을 제공하는 기술입니다.
자주 사용하는 눈누 사이트(https://noonnu.cc/)에서도 볼 수 있습니다
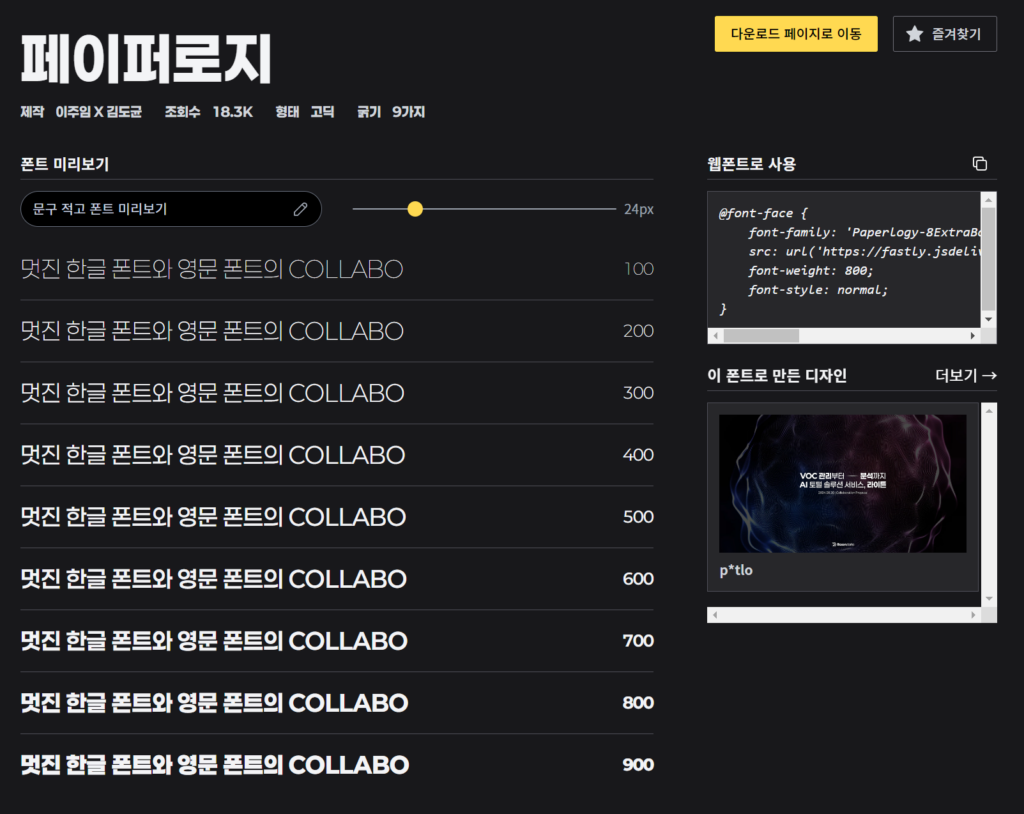
웹폰트를 CDN 으로 제공할 경우 HTML 파일의 헤더에 별다른 첨부 없이
CSS 파일에 소스를 추가하면 바로 적용이 가능합니다.
/* 웹폰트 CDN으로 첨부 */
@font-face {
    font-family: 'Paperlogy';
    src: url('https://fastly.jsdelivr.net/gh/projectnoonnu/2408-3@1.0/Paperlogy-1Thin.woff2')
         format('woff2');
    font-weight: 100;
    font-style: normal;
}
@font-face {
  font-family: 'Paperlogy';
  src: url('https://fastly.jsdelivr.net/gh/projectnoonnu/2408-3@1.0/Paperlogy-2ExtraLight.woff2')
       format('woff2');
  font-weight: 200;
  font-style: normal;
}
@font-face {
  font-family: 'Paperlogy';
  src: url('https://fastly.jsdelivr.net/gh/projectnoonnu/2408-3@1.0/Paperlogy-3Light.woff2')
      format('woff2');
  font-weight: 300;
  font-style: normal;
}
@font-face {
  font-family: 'Paperlogy';
  src: url('https://fastly.jsdelivr.net/gh/projectnoonnu/2408-3@1.0/Paperlogy-4Regular.woff2')
       format('woff2');
  font-weight: 400;
  font-style: normal;
}
@font-face {
  font-family: 'Paperlogy';
  src: url('https://fastly.jsdelivr.net/gh/projectnoonnu/2408-3@1.0/Paperlogy-5Medium.woff2')
       format('woff2');
  font-weight: 500;
  font-style: normal;
}
@font-face {
  font-family: 'Paperlogy';
  src: url('https://fastly.jsdelivr.net/gh/projectnoonnu/2408-3@1.0/Paperlogy-6SemiBold.woff2')
       format('woff2');
  font-weight: 600;
  font-style: normal;
}
@font-face {
  font-family: 'Paperlogy';
  src: url('https://fastly.jsdelivr.net/gh/projectnoonnu/2408-3@1.0/Paperlogy-7Bold.woff2')
       format('woff2');
  font-weight: 700;
  font-style: normal;
}
@font-face {
  font-family: 'Paperlogy';
  src: url('https://fastly.jsdelivr.net/gh/projectnoonnu/2408-3@1.0/Paperlogy-8ExtraBold.woff2')
       format('woff2');
  font-weight: 800;
  font-style: normal;
}
@font-face {
  font-family: 'Paperlogy';
  src: url('https://fastly.jsdelivr.net/gh/projectnoonnu/2408-3@1.0/Paperlogy-9Black.woff2')
       format('woff2');
  font-weight: 900;
  font-style: normal;
}

body{
  font-family: 'Paperlogy';
}
5. 웹폰트, 로컬폰트, CDN 방식의 장단점
웹폰트 (Web Font)
- 정의: 웹에서 직접 URL을 통해 불러오는 폰트. Google Fonts 같은 외부 폰트 제공 서비스에서 링크를 통해 불러와 사용.
장점:
- 간편함: 외부 서비스에서 제공하는 폰트를 링크로 간단하게 불러와 사용할 수 있습니다.
- 자동 업데이트: 폰트 제공 서비스에서 폰트를 업데이트하면, 자동으로 최신 버전을 사용할 수 있습니다.
- 다양한 선택: 여러 스타일과 언어를 지원하는 다양한 폰트를 쉽게 사용할 수 있습니다.
단점:
- 의존성: 외부 서비스에 의존하게 되므로, 서비스 제공자가 다운되거나 느려지면 웹사이트의 폰트 로딩에 문제가 생길 수 있습니다.
- 속도 저하: 외부 리소스를 불러오기 때문에 페이지 로딩 속도에 영향을 줄 수 있습니다.
- 라이선스 문제: 무료로 제공되는 폰트도 라이선스 조건을 주의 깊게 확인해야 합니다.
로컬폰트 (Local Font)
- 정의: 폰트 파일을 웹 서버에 직접 업로드하고, CSS의
@font-face를 통해 웹사이트에 적용하는 방식.
장점:
- 제어 가능성: 폰트 파일을 직접 관리할 수 있어, 파일의 버전이나 스타일을 완전히 제어할 수 있습니다.
- 안정성: 외부 서비스에 의존하지 않기 때문에, 서버의 상태가 안정적이라면 폰트 로딩 문제를 줄일 수 있습니다.
- 맞춤화: 폰트의 서브셋(subset)을 만들어 필요한 문자만 포함한 폰트를 사용하여 파일 크기를 줄일 수 있습니다.
단점:
- 서버 부하: 폰트 파일이 서버에 저장되어 있어, 서버에 추가적인 부하가 발생할 수 있습니다.
- 관리 부담: 폰트 파일의 설치, 유지보수 및 라이선스 관리가 필요합니다.
- 캐싱 부족: 웹폰트나 CDN 폰트에 비해, 다른 사이트에서 이 폰트가 캐시되지 않기 때문에 첫 로딩 시 느릴 수 있습니다.
CDN (Content Delivery Network) 방식
- 정의: 전 세계에 분산된 서버 네트워크를 통해 폰트 파일을 제공하는 방식. 예를 들어, Google Fonts, Adobe Fonts 등이 있습니다.
장점:
- 빠른 로딩 속도: 사용자와 가까운 서버에서 폰트를 불러오기 때문에 로딩 속도가 빠르고 안정적입니다.
- 광범위한 캐싱: 인기 있는 CDN 서비스의 폰트는 이미 많은 사용자의 브라우저에 캐시되어 있을 가능성이 높아, 더 빠른 로딩이 가능합니다.
- 간편함: 설정이 간단하고 유지보수 부담이 적습니다.
단점:
- 제어 불가: 폰트 파일에 대한 직접적인 제어가 불가능하며, 폰트 스타일이나 버전을 자유롭게 변경하기 어렵습니다.
- 의존성: CDN 서비스가 중단되거나 문제가 생기면 폰트 로딩에 영향을 미칠 수 있습니다.
- 프라이버시 우려: CDN을 사용할 때 사용자 정보가 해당 서비스 제공자에게 노출될 수 있습니다.
요약:
- 웹폰트: 사용이 간편하고 다양한 선택지가 있지만, 외부 서비스에 의존해야 하며 속도 저하가 있을 수 있습니다.
- 로컬폰트: 폰트를 완전히 제어할 수 있고 안정적이지만, 서버 부하와 관리의 부담이 따릅니다.
- CDN: 빠르고 광범위한 캐싱이 가능하지만, 제어권이 부족하고 외부 서비스에 의존하게 됩니다.
각 방식은 웹사이트의 특성과 요구사항에 따라 적절하게 선택하는 것이 중요합니다.